• Skip to main content
  • Skip to footer

Dawna Stone

You Can Have A Better Life

  • Home
  • About Dawna
  • Speaking
  • Blog
  • Contact

Diet

Gluten-Free Cherry Vanilla Oat Bread

April 8, 2015 by Dawna Stone

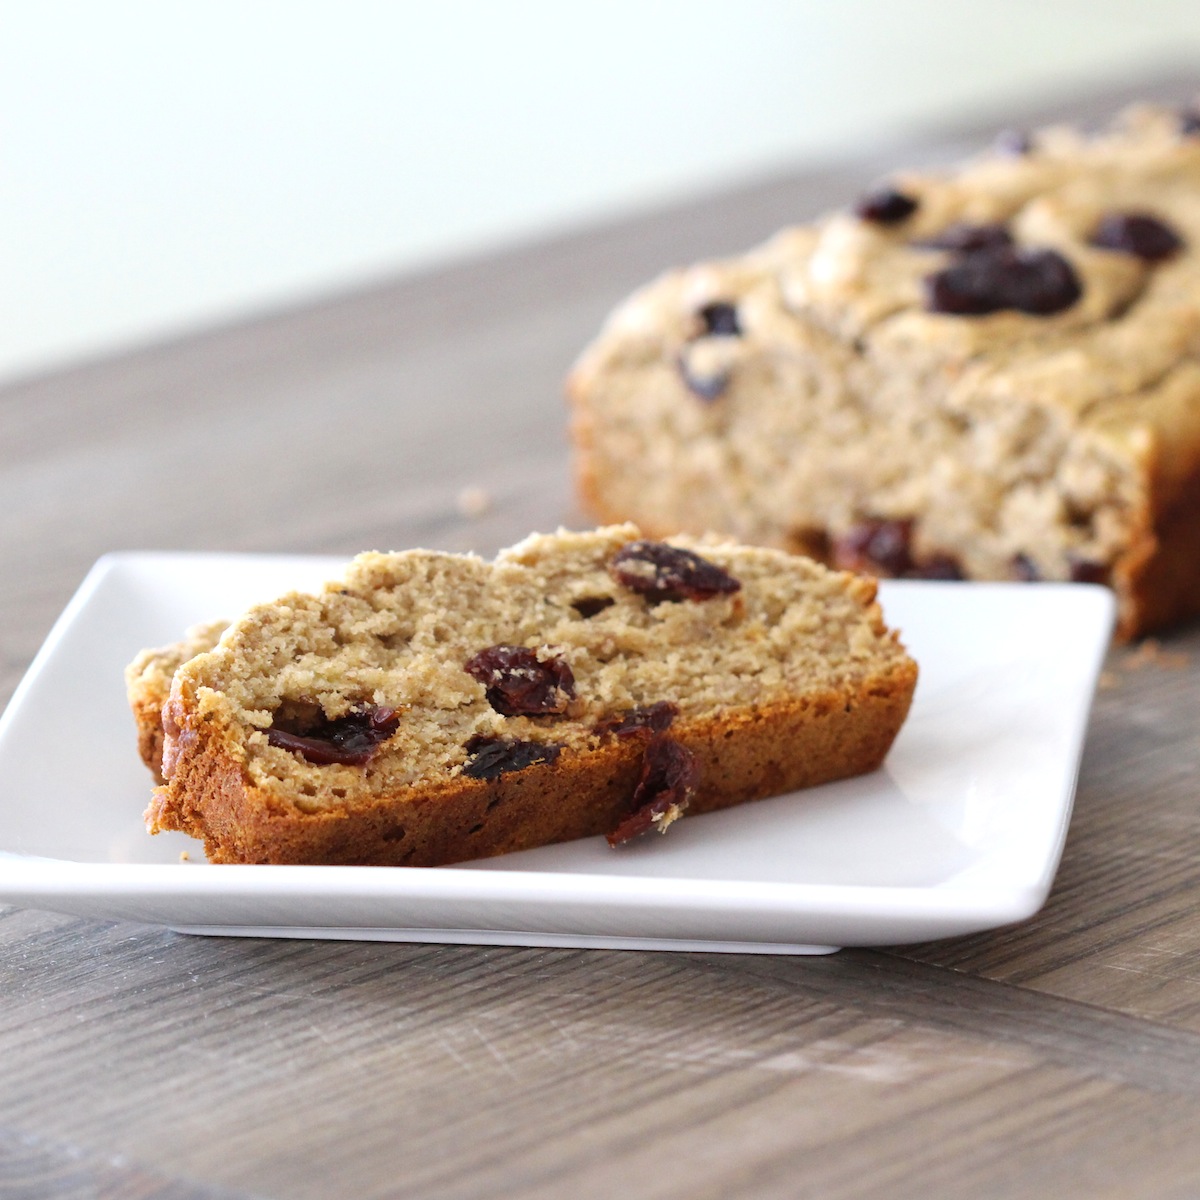
If you’re like me and love the combination of cherry and vanilla, you’ll be head-over-heels for this Cherry Vanilla Oat Bread. It’s not too sweet which makes it the perfect breakfast choice, but it’s just sweet enough that it also makes a great mid-afternoon snack or after-dinner treat.

With two little kids at home, I’m always well stocked on bananas, as they’re a quick grab-and-go snack. But this also means I often find myself with bananas that are too ripe for the kids’ taste. I found a great way to use up my over-ripe bananas and at the same time make my bread recipe extra moist without adding any dairy.

On Plate 1200x1200  Wet Ingredients 1200x1200  Pre-Baked 1200x1200 Overhead in Tray2Two Slices 1200x1200 v2

Cherry Vanilla Oat Bread
Gluten-Free, Dairy-Free
Servings
12
Servings
12
Cherry Vanilla Oat Bread
Gluten-Free, Dairy-Free
Servings
12
Servings
12
Ingredients
  • 2cups gluten-free oat flour
  • 1teaspoon gluten-free baking powder
  • 1/2teaspoon baking soda
  • 1/2teaspoon sea salt
  • 2large eggs
  • 1cup mashed ripe bananas(approximately 2-3 bananas)
  • 1/4cup honey
  • 1/4cup almond milk
  • 3tablespoons melted coconut oil
  • 1 1/2teaspoon pure vanilla extract
  • 1/2cup dried cherries
Servings:
Instructions
  1. Preheat the oven to 350°F. Line the bottom and short ends of an 8” x 4” loaf pan with parchment paper or lightly coat with olive oil.
  2. In a medium bowl, whisk together the oat flour, baking powder, baking soda and sea salt.
  3. In a large bowl, whisk the eggs. Add the mashed bananas, honey, almond milk, coconut oil and vanilla extract.
  4. Add the dry ingredients to the egg mixture and stir gently to combine. Fold in all but 10 to 12 cherries.
  5. Pour the batter into the pan and scatter the remaining cherries over the top of the loaf.
  6. Bake for approximately 45 minutes or until a wooden pick inserted in the center of the loaf comes out clean and the top is golden brown.
  7. Set the pan on a rack for 10 minutes to cool. Remove the loaf from the pan and cool completely on the rack before slicing.
Recipe Notes

(Make sure to mash the bananas before you combine them with the other wet ingredients. I’ve made the mistake of just tossing in the bananas before and although it works, it can get a little messy.)

Share this Recipe
  • Twitter
  • Facebook
  • Google+
  • Pinterest


How Do You Proceed After Weight Loss Success?

September 17, 2017 by Dawna Stone

Happy celebrating winning success woman sunsetI want to personally congratulate everyone who participated in the 14-Day Healthy You Challenge! Based on the feedback, participants lost 6-12 pounds during the two weeks and many are saying they feel better than ever!

One of the main questions I’m receiving now is how to progress once the initial two weeks on the program is complete. I hope this post will help you with continued success once you’ve completed the 14-Day Healthy You! program. For those that didn’t participate in the challenge, this post should still give you some insight on how to move forward after following any successful weight loss program.

Although the Healthy You Challenge focused on eliminating certain foods and progressing to a 100% clean diet, I understand that this may not always be realistic. Also, I realize that people don’t want to be on a “diet” forever. This is precisely why I developed the program in such a way that allows people to incorporate their favorite foods after the initial 14 days. To avoid feeling deprived, just be sure to indulge in moderation and follow a few simple tips:

Consume Previously Eliminated Food Moderately
I’m sure there are people who eat a perfectly clean diet all of the time. I am not one of them. The good news? You don’t have to adhere to a 100% clean diet 365 days a year. You can still lead a healthy lifestyle, maintain an ideal weight and even lose pounds if you sometimes indulge in your favorite foods. But be mindful and continue consuming previously eliminated food moderately. Additionally, incorporate meals from the Healthy You Challenge alongside your own recipes.

Pay Attention, Listen to Your Body, and Adjust Accordingly
Pay attention to how your body reacts to the reintroduction of some of the eliminated foods. For example, you may find that you feel fine after adding wheat back into your diet, but that dairy upsets your stomach. Or perhaps you notice you feel better without wheat in your diet. By slowly clearing your system of sugar, wheat, dairy, processed foods and other questionable items, you will better understand the likelihood of specific foods negatively affecting your body. Although I love bread, pizza and pastries, I’ve learned that my body doesn’t deal well with an overabundance of wheat (moderation is fine, but too much causes stomach discomfort). I found that as long as I only eat wheat at one meal a day (rather than all three), I feel fine.

Put Thought into Culinary Choices
Really think about what you are choosing to eat and if there are healthier substitutions for those items. When adding wheat back into your diet, choose whole grains. Choose whole wheat bread instead of white. Choose brown rice over white. For meat, choose organic whenever possible and select lean cuts. If you want to enjoy an alcoholic beverage, choose wine over a higher-calorie mixed drink.

For Additional Weight Loss, Stay on the Clean Phase
You may discover that you feel so good after completing the Clean Phase of the Healthy You! program that you want to continue this way of eating, allowing you to healthfully drop additional weight. If you still have 20 or more pounds to lose, I suggest staying on the Clean Phase for at least one more week.

Remember: After week two, you choose how to move forward. Some people start to feel so good and drop weight so quickly by the end of week two, they want to continue to eat clean. Others, no matter the positive progress, can’t fathom another day without one of the eliminated foods (I understand how they feel!). Again, this is the beauty of the Healthy You Challenge; the two weeks provide a jump start on your weight loss while simultaneously giving you the tools to change your eating habits for life. Just two weeks of healthier eating often prove enough to forever change the way you look at what you put into your body.

It’s often difficult for people to know how to proceed after finishing the Healthy You! program or any other weight loss program. Many are fearful of returning to old eating patterns. The best way to avoid this is to continue to incorporate some of the meals and or snacks that you enjoyed during the program. Should you find yourself slipping back into old, unhealthy eating habits after completing the 14-day Healthy You Challenge simply recommence the 14-day plan. Another week on the Elimination Phase plus another on the Clean Phase will get you back on track.

Use what you learned to help you make smart choices going forward. Personally, I consume wheat, dairy, sugar and alcohol in moderation and only on occasion. I try to drastically reduce or completely eliminate my intake of red meat, artificial sweeteners and highly processed foods. Based on my personal experience, the cleaner your diet, the more weight you’ll continue to lose and the healthier you’ll feel.

No matter what you decide, I am here to help and will continue to offer healthy eating tips, recipes, videos and encouragement along the way.  Don’t stress about the foods you eat – just be mindful. And remember, we will be doing another Healthy You Challenge in the future. I hope you will join me!

Oatmeal with Fresh Berries and Almond Milk

October 31, 2013 by Dawna Stone

Are you growing tired of your typical morning meal? Add some variety by incorporating oatmeal. Oatmeal is ideal if you are trying to lose or maintain weight. Just remember, it is easy to consume more than the recommended serving size. Pay close attention to the recipe and/or label to make sure you are keeping to a single serving. Also, add a touch of fresh fruit or milk for that little bit of balanced sweetness.

Oatmeal with Fresh Berries and Almond Milk
Servings
1
Servings
1
Oatmeal with Fresh Berries and Almond Milk
Servings
1
Servings
1
Ingredients
  • 1 1/2cups water
  • 1/2cup gluten-free steel-cut oats
  • 1/2cup mixed berries
  • 1/2cup unsweetened almond milk
Servings:
Instructions
  1. In a saucepan over medium-high heat, bring the water to a boil.
  2. Add the oats, cover, and reduce the heat to low.
  3. Cook, stirring occasionally, for 10 to 20 minutes. The length of time needed to cook the oats depends on the type of oats and how chewy you like them. Steel-cut oats take longer than rolled oats.
  4. Remove the covered pan from the heat and let it sit for a few minutes.
  5. Serve the hot oatmeal topped with the berries and milk.
Share this Recipe
  • Twitter
  • Facebook
  • Google+
  • Pinterest

Grilled Herb Chicken with steamed broccoli and green salad

October 31, 2013 by Dawna Stone

Most everyone likes a good grilled chicken recipe. Chicken is easy to make and a good protein-rich meal that can please everyone in the family (even the kids!). This grilled chicken recipe has a fresh herb flavor you're sure to love! Don't forget the veggies – the broccoli and side salad are the perfect pair.

Grilled Herb Chicken with Steamed Broccoli and Green Salad
Servings
4
Servings
4
Grilled Herb Chicken with Steamed Broccoli and Green Salad
Servings
4
Servings
4
Ingredients
  • 4 boneless, skinless chicken breast halvespounded to an even thickness
  • 1tablespoon extra virgin olive oil
  • 1teaspoon dried oregano
  • 1teaspoon fresh thyme leavesor 1/4 teaspoon dried
  • 1teaspoon fresh rosemary leaves
  • 1/2teaspoon sea salt
  • 1/4teaspoon minced garlic
  • 1head broccoli
  • 4cups mixed greens
  • 8-12 grape tomatoes
  • 1/2 cucumberdiced
  • 2tablespoons dressing of your choice(see below for dressing options)
Servings:
Instructions
  1. Herb Chicken: Preheat a grill pan over medium heat. Meanwhile, in a resealable plastic bag, combine the chicken, oil, oregano, thyme, rosemary, salt and garlic. Shake the sealed bag to coat the chicken. Transfer the chicken to the grill pan and cook, turning once, for 6 to 8 minutes, or until a thermometer inserted in the center registers 165 degrees and the juices run clear. Transfer the chicken to a serving platter and let it stand for 3 minutes to reabsorb the juices before slicing and serving. Note: If you don't have access to a grill, place chicken in a glass dish and bake at 350 degrees for approximately 15-20 minutes, turning once, or until no trace of pink remains.
  2. Steamed Broccoli: Rinse broccoli, cut off stalk, and break into bite-size pieces. Bring 1-inch water and salt to boil in saucepan with steamer. Add broccoli, and cover, reduce heat to medium, and cook for 4-6 minutes or until broccoli is bright green and tender. Note: If you don't have a steamer, steam vegetables directly in water.
  3. Green Salad: Combine mixed greens, tomatoes, and cucumbers, and divide onto 4 plates. Drizzle with dressing of your choice (see below for dressing options).
Share this Recipe
  • Twitter
  • Facebook
  • Google+
  • Pinterest
White Balsamic Vinaigrette Dressing
Makes about 1 cup.
White Balsamic Vinaigrette Dressing
Makes about 1 cup.
Ingredients
  • 3/4cup white balsamic vinegar
  • 1/4cup extra virgin olive oil
  • 2tablespoons Dijon mustard
  • 1/2teaspoon sea salt
  • 1/4teaspoon Ground black pepper
Servings:
Instructions
  1. In a jar with a lid, mix together the vinegar, oil, and mustard. Add the salt and pepper, cover with the lid, and shake well before serving.
  2. Refrigerate any leftover dressing for 3 to 5 days. Shake well before serving.
Share this Recipe
  • Twitter
  • Facebook
  • Google+
Italian Vinaigrette Dressing
Makes about 3/4 cup.
Italian Vinaigrette Dressing
Makes about 3/4 cup.
Ingredients
  • 6tablespoons extra virgin olive oil
  • 6tablespoons red wine vinegar
  • 2tablespoons lemon juice
  • 2teaspoons Dijon mustard
  • 2teaspoons minced garlic
  • 1/2teaspoon sea salt
  • 1/4teaspoon Ground black pepper
Servings:
Instructions
  1. In a jar with a lid, mix together the oil, vinegar, and lemon juice. Add the mustard, garlic, salt, and pepper. Cover with the lid and shake well before serving.
  2. Refrigerate any leftover dressing for 3 to 5 days. Shake well before serving.
Share this Recipe
  • Twitter
  • Facebook
  • Google+
Walnut Vinaigrette Dressing
Makes 1/2 cup.
Walnut Vinaigrette Dressing
Makes 1/2 cup.
Ingredients
  • 1/4cup extra virgin olive oil
  • 1/4cup walnut pieces
  • 2tablespoons apple cider vinegar
  • 1teaspoon Dijon mustard
  • 1teaspoon grated orange peel
  • 1 clove garlicchopped
  • 1/4teaspoon sea salt
  • 1/4teaspoon Ground black pepper
Servings:
Instructions
  1. In a blender or mini food processor, combine the oil, walnuts, vinegar, mustard, orange peel, garlic, salt, and pepper. Blend or process just until coarse.
Share this Recipe
  • Twitter
  • Facebook
  • Google+
  • Pinterest
Citrus Vinaigrette Dressing
Makes about 1 cup.
Citrus Vinaigrette Dressing
Makes about 1 cup.
Ingredients
  • 6tablespoons red wine vinegar
  • 1/4cup lemon juice
  • 1/4cup orange juice
  • 1/4cup extra virgin olive oil
  • 2tablespoons Dijon mustard
  • 1/2teaspoon sea salt
  • 1/4teaspoon Ground black pepper
Servings:
Instructions
  1. In a jar with a lid, mix together the vinegar, lemon and orange juices, and oil. Add the mustard, salt, and pepper. Cover with the lid and shake well before serving.
  2. Refrigerate any leftover dressing for 3 to 5 days. Shake well before serving.
Share this Recipe
  • Twitter
  • Facebook
  • Google+
Greek Dressing
Makes about 1 cup.
Greek Dressing
Makes about 1 cup.
Ingredients
  • 1/2cup extra virgin olive oil
  • 1/4cup red wine vinegar
  • 1/4cup lemon juice
  • 2 tablespoons+2 teaspoons fresh oregano leaves(or 4 teaspoons dried oregano)
  • 1/2teaspoon sea salt
  • 1/4teaspoon Ground black pepper
Servings:
Instructions
  1. In a jar with a lid, mix together the oil, vinegar, and lemon juice. Add the oregano, salt, and pepper. Cover with the lid and shake well before serving.
  2. Refrigerate any leftover dressing for 3 to 5 days. Shake well before serving.
Share this Recipe
  • Twitter
  • Facebook
  • Google+

8 Simple Tips for Saving 100 Calories a Day!

September 13, 2013 by Dawna Stone

Did you know that simply cutting out 100 calories a day could help you lose 10 pounds in a year? Unfortunately, the opposite is true too: Eat just 100 more calories a day than you burn and that can equate to gaining 10 pounds in a year. Eat 200 more a day and you could gain 20 pounds in a year!

When I want to save 100 calories I make small, simple changes – I say no to the basket of bread or ask for my salad dressing on the side.

Here are just a few items that you could skip to lose!

  • 1 oz potato chips: 155 calories
  • Small (16 oz) sweet tea: 140 calories
  • One can (12 oz) soda: 150 calories
  • Two tablespoons ranch dressing: 146 calories
  • 1 oz blue cheese: 100 calories
  • 2 oz French bread: 150 calories
  • 1 cup frozen yogurt (no toppings): 221 calories

Reducing your intake by 100 calories a day is simple.  Just follow these 8 tips to save 100 calories and be on track to lose 10 pounds.

1)   Ask for non-fat milk instead of whole milk in your morning latte

2)   Choose smaller plates and glasses as this can help you control portion size

3)   Drink water or un-sweet ice tea in place of soda or sweet tea

4)   Eat slowly to make your meal last and reduce the urge for second helpings

5)   Request your salad dressing on the side rather that on the salad

6)   When cooking, use non-stick cooking spray rather than butter

7)   Order food grilled or steamed rather than fried or sautéed

8)   Keep late night snacking to a minimum or better yet, don’t snack after dinner

Making small lifestyle changes to reduce calories can have a big impact on the scale. Do you have any fun or unique tips that help you maintain your weight or help you lose weight? If so, please share them with me.

Portion Distortion

September 5, 2013 by Dawna Stone

https://youtube.com/watch?v=0AqfMQp5opE%3Flist%3DUU7XrCBUIOJ1Vcv-QzjZk1lQ

  • « Go to Previous Page
  • Go to page 1
  • Go to page 2

Footer

Site

  • About Dawna
  • Speaking
  • Contact Dawna Stone

Write A Book

  • Blog Posts
  • Books
  • Course

Improve Your Life

  • Blog Post
  • Books

Improve Your Health

  • Blog Posts
  • Recipes
  • Books
  • Course

Get In Touch

Follow me on Social Media
FacebookTwitterPintrestInstagram

DAWNA STONE All Rights Reserved – Copyright © 2021

Copyright © 2023 · Dawna Stone on Genesis Framework · WordPress · Log in